
"OFF WITH YOUR HEAD!"
Heeeey guys, noooo don't worry I'm not after your heads! This sentence is actually a trademark phrase of a movie/tale character that I find very amusing. Can you guess who it is? :D
Anyways, this is going to be the first of the Halloween costume inspirations I'd like to give you.
You're a fan of Tim Burton's movie "Alice in Wonderland"?
Then read on to see how I created this "Queen of Hearts" inspired look.
~ Mary ~
 |
| Tim Burton's Queen of Hearts source: digitalcitizen.ca |
Now here she goes: Tim Burton's "Queen of Hearts".
Doesn't she look...well big-headed? :D
I totally liked the way Burton portrayed her. Of course she was the villian in the movie and yet Burton managed to add an extremely hilarious touch to her character.
Anyways, I found her so amusing that I knew I had to recreate her look at some time which is what I actually did a year ago or so.
My look will appear a little toned down, as you will notice. That is because I wanted to make it a liiiitttle more wearable (of course this is still a look you shouldn't be wearing around in everyday life, hahaha).
Nevertheless I hope you like my interpretation!
MAKEUP TUTORIAL
Since I did this look last year, I have no tutorial footage in store for you. Also I'm staying at my dorm right now which again means that I don't have all the materials to recreate the look...
BUT I found an alternative way to teach you guys how to turn yourselves into the "Queen of Hearts":
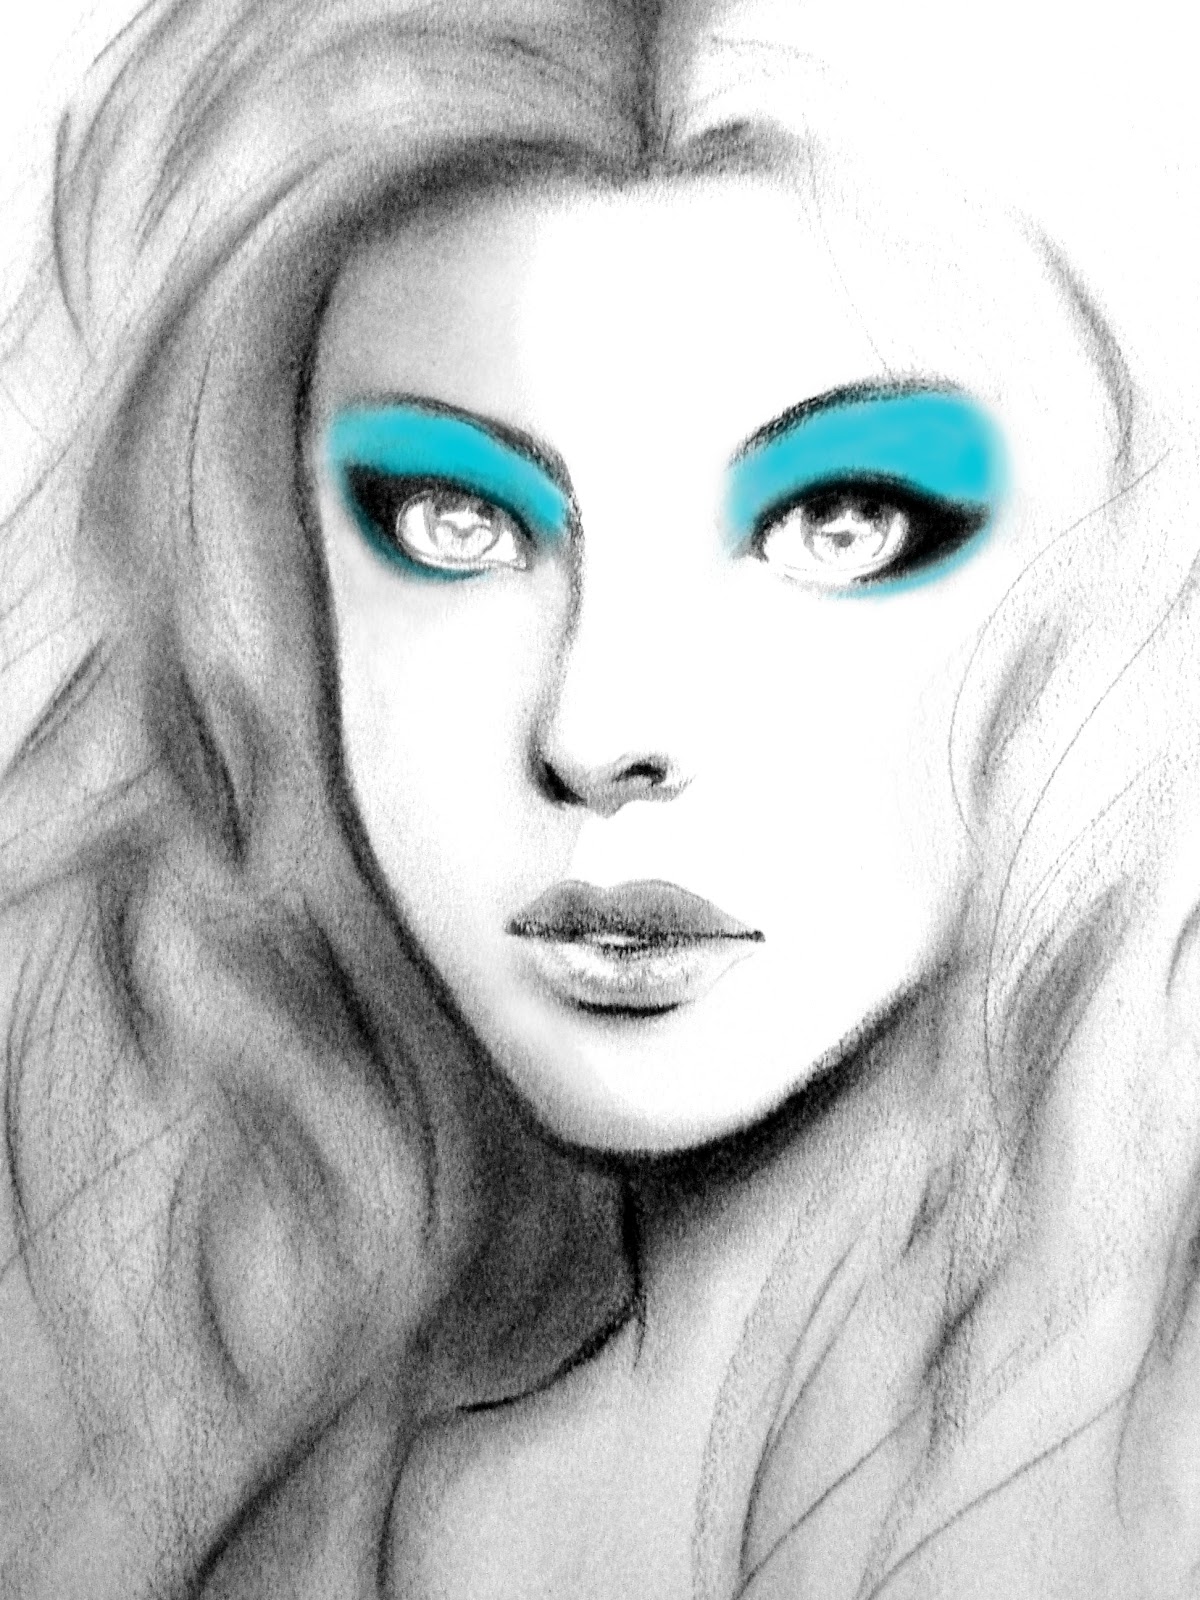
Let me introduce you to my makeup model:
 |
| Alice the Makeup Model |
I'm sorry to disappoint you, if you were thinking of
a real model! :D
No, I'll be using this girl here. And yes, it's my own creation (I think I already mentioned that I loooove to draw).
To make things a little easier we'll give her a name, shall we? How about...Alice?
(Should be good for now, if you guys have better suggestions, let me know in the comments below.)
Now that we got a model, let's get straight to the tutorial!
STEP 1 - THE EYES
EYEBROWS
In Tim Burton's movie the Queen of Hearts has veeeery thin eyebrows that are also located veeeery high above her eyes. If you want to recreate those scary eyebrows you will have to "erase" your actual brows:
gluestick your actual brows down and cover them up with a concealer, then go ahead and draw on new brows with a black coal eye liner, basically two thin stripes located in the middle of your forehead. However if you don't want to go too extreme, then feel free to skip that step (that is what I actually did).
EYESHADOW
Prime your lids with an eye shadow primer of your choice and select a light blue/teal/turquoise eye shadow to basically load on that colour on your entire eye lids. Be sure to bring the colour all the way up to your brow bones. And also don't forget to balance the eyes out by adding the colour to your lower lash line. I did this on Alice, as you can see.

In the next step you want to bring back some dimension to your eyes. Although the original Queen of Hearts has nothing but that one solid 1-dimensional blue shade on her lids, we, as normal human beings, definitely look better with 3-dimensional eyes. As you can see on Alice, all you need to do is to take an eye shadow shade that is a few shades darker than your main colour. With that colour go ahead and define the outer half of your eyes. Take the colour into your eye creases as well. If you don't have an eye crease (monolids) then I'd recommend you to take the shade as far as your eye liner would normally go.
In this step you should make sure to blend the two colours in very well!
EYELINER
Alice already has a strong cat eye due to the eye liner I gave her beforehand ;)
As for you guys, it's really up to you. Go as crazy as you want to with your eye liner. Generally I'd recommend you to take a deep black eye liner and go for a thick (winged out, if you prefer) line.

EYELASHES
As for the lashes go ahead and put on thick coats of mascara plus false lashes. I went with some spiky lashes on Alice's lower lash line. Do focus on your lower lashes, too!

STEP 2 - THE FACE
FOUNDATION
I started off with the eyes on purpose, because you will be having a lot of eye shadow fall outs on your face due to the heavy and rich colours we used.
After wiping off all of this mess we can now move on to the face.
Alice already has a totally white complexion. You guys will have to create this white cast on your face with the help of white makeup or at least a foundation that's a few shades lighter than your normal complexion. After you're done with the foundation, go ahead and set it with translusent loose powder.
EXTRA TOUCHES
Draw on a fake mole on one of your cheeks for this extra touch of sassy nobility. I think Alice looks quite good with her mole, haha.
Then there are some optional steps: If you want to you can contour your cheek bones with a bronzer. Stick with a greyish toned brown or a taupe shade. If you don't know where to contour here's a common trick that helps you to locate the places your bronzer should go: Suck in your cheeks, in other words, make that "fish face". The parts of your cheeks that appear sunken in indicate the spots where you need to create darker shadows with your contouring. The purpose of that is to create the illusion of an overall thinner face.
If you need/want to you can also put on some blush. I'd recommend a slightly redish toned blush to stick with the overall theme of the red Queen of Hearts. Blush will also bring a cuter side to your look.

STEP 3 - THE LIPS
And now it's finally time for the finishing touch of this whole look: the queen's trademark heart-shaped lips!
To achieve the perfect heart-shaped lips you firstly need to conceal your actual lips with a concealer.
Then take a red lip liner (you can also use a black liner if you want a more vampy-ish defined look) and draw on an outline for your desired heart-shape. I suggest you to go a little beyond your actual lips when drawing the top part of the heart. Since we're shrinking our lips down to a tiny heart shape you'll get fuller looking lips with that trick.
After you've got that just go ahead and fill in your outline with a rich red lipstick of your choice. For extra glamour you can top it all off with a clear lipgloss.
And...VOILÀ your makeup is done!
THE COSTUME

STEP 1 - THE WIG
You will need a red super curly clown-like wig. Put it on, adjust some strands of hair if needed and style the wig the way you want it to sit on you.
STEP 2 - THE OUTFIT
You could of course find yourself a very authentic queen's gown that will make you look just like the real Queen of Hearts.
However if you want to keep your costume on a low-budgetr then come up with your own outfit made up of stuff you already have in your closet! That's also what I actually did: Find yourself a nice little, puffy dress and stick with the main colours black, gold and red. In my case it's a black-red leopard printed dress that I topped off with a black bolero. As for the bottom I wore black-red checkered tights on that day and also a pair of black pumps. Just be creative and give your costume its very own modern and sassy twist!
STEP 3 - THE ACCESSORIES

The Queen of Hearts always carries around her sceptre!
This is actually a DIY sceptre. I took a porcelain heart-shaped decoration piece and covered each half of it with some red and black glitter paint. I added a cross in the middle with a golden glitter marker. As a finishing touch I folded myself a tiny paper crown, covered it in golden glitter and glued in onto the left top part of the heart. At the end I glued the heart ornament on a wooden stick that I wrapped up in golden adhesive foil.
Again just be creative and make yourself your own sceptre out of stuff you find idly lying around in your home! ;)

What would a queen be without a crown?!
As for the crown I was able to buy that very cheap golden crown at a local toys store.
I hope I could give you guys a fun idea for your upcoming Halloween costumes!
If you choose to recreate this look, I'd really like to see your versions.
And with all this said and explained:
HAPPY UPCOMING HALLOWEEN
and look out for more costume inspirations that I will be bringing up soon!
No comments:
Post a Comment